
However, installing shut-off valves on plastic pipes can pose unique challenges due to the material’s characteristics. In this guide, we’ll explore the process of installing a shut-off valve on plastic pipe, including essential tools and materials, preparation steps, the installation process, and final checks and maintenance procedures.
I. Introduction
A. Importance of shut-off valves on plastic pipe
Shut-off valves play a vital role in plumbing systems, allowing homeowners to control the flow of water to specific fixtures or areas of their homes. In case of leaks or emergencies, shut-off valves provide a convenient way to isolate the water supply and prevent further damage.
B. Challenges of installing on plastic pipes
Installing shut-off valves on plastic pipes presents challenges due to the material’s flexibility and susceptibility to damage. Proper techniques and tools are essential to ensure a secure and leak-free installation.
C. Overview of the installation process
The installation process involves shutting off the water supply, preparing the pipe, attaching the shut-off valve, testing for leaks, and performing final checks and maintenance to ensure proper functionality.
II. Tools and Materials
A. Essential tools
- Pipe cutter: A pipe cutter is necessary for cutting plastic pipes to the desired length with precision and accuracy.
- Adjustable wrench: An adjustable wrench is used to tighten fittings securely without damaging them.
- Deburring tool: A deburring tool is essential for smoothing the edges of cut pipes to prevent damage to the shut-off valve and ensure a proper seal.
B. Required materials
- Shut-off valve: Choose a shut-off valve suitable for plastic pipes, ensuring compatibility with the pipe diameter and material.
- Pipe fittings: Select appropriate pipe fittings, such as couplings and adapters, to connect the shut-off valve to the existing plumbing system.
- Teflon tape: Teflon tape is used to seal threaded connections and prevent leaks, providing an additional layer of protection against water damage.
III. Preparation
A. Shutting off water supply
- Locating main water valve: Locate the main water valve in your home and turn it off to cut off the water supply to the area where you’ll be installing the shut-off valve.
- Turning off water supply: Turn off any additional valves or faucets connected to the plumbing system to ensure no water is flowing through the pipes during the installation process.
B. Preparing the pipe
- Measuring and marking: Measure the pipe to determine the location for installing the shut-off valve and mark it accordingly with a pencil or marker.
- Cutting the pipe: Use a pipe cutter to cut the pipe at the marked location, ensuring a clean and straight cut to facilitate proper fitting and sealing.
- Deburring edges: Use a deburring tool to remove any burrs or rough edges from the cut pipe to prevent damage to the shut-off valve and ensure a tight seal.
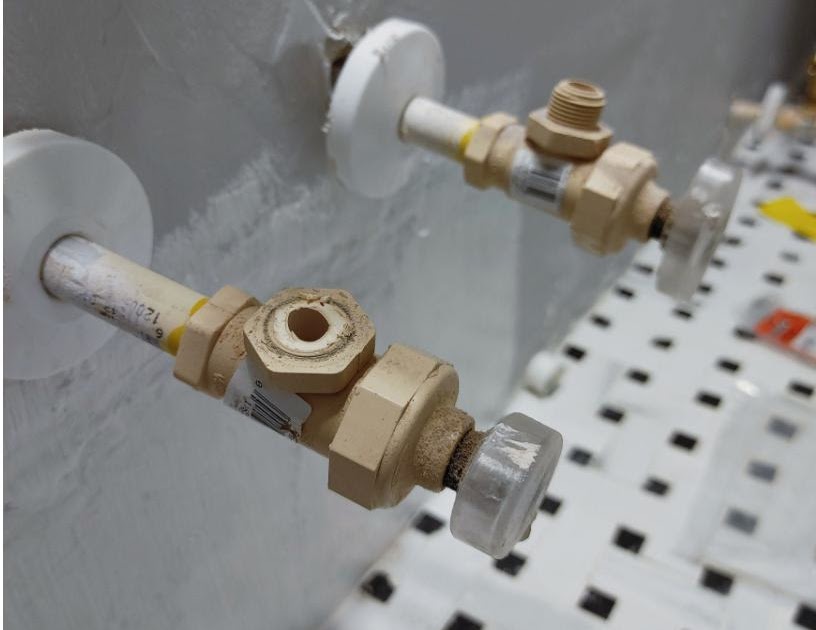
IV. Installing the Shut-Off Valve
A. Attaching the valve
- Applying Teflon tape: Wrap Teflon tape clockwise around the male threads of the shut-off valve to create a tight seal and prevent leaks.
- Securing fittings: Attach the shut-off valve to the cut end of the pipe using appropriate fittings, ensuring a secure and snug fit.
- Tightening connections: Use an adjustable wrench to tighten the fittings securely, taking care not to over-tighten and damage the plastic threads.
B. Testing for leaks
- Turning on water supply: Turn on the main water valve to restore water flow to the plumbing system and pressurize the newly installed shut-off valve.
- Checking for leaks: Inspect the connections and joints of the shut-off valve for any signs of leaks or drips, paying close attention to areas where Teflon tape is applied.
- Making adjustments: If leaks are detected, tighten the fittings slightly or reapply Teflon tape as needed to achieve a proper seal and eliminate leaks.
V. Final Checks and Maintenance
A. Inspecting connections
- Checking for tightness: Double-check all connections and fittings to ensure they are tightened securely and there are no loose or wobbly components.
- Ensuring proper alignment: Verify that the shut-off valve is properly aligned with the pipe and other plumbing fixtures to prevent stress on the connections.
- Reapplying Teflon tape if necessary: If any fittings or connections appear loose or compromised, reapply Teflon tape and tighten them as needed to prevent leaks.
B. Routine maintenance
- Periodic inspections: Regularly inspect the shut-off valve and surrounding plumbing components for signs of wear, corrosion, or leaks, and address any issues promptly.
- Lubricating valve components: Apply lubricant to the valve handle and moving parts to ensure smooth operation and prevent sticking or seizing over time.
- Addressing any issues promptly: If you encounter any problems or issues with the shut-off valve, such as leaks or difficulty turning the valve handle, address them promptly to prevent further damage and ensure continued functionality.
By following these steps and precautions, homeowners can successfully install a shut-off valve on plastic pipe and enhance the safety and functionality of their plumbing systems. Proper installation and maintenance of shut-off valves are essential for preventing water damage and ensuring the longevity of plumbing fixtures and appliances.