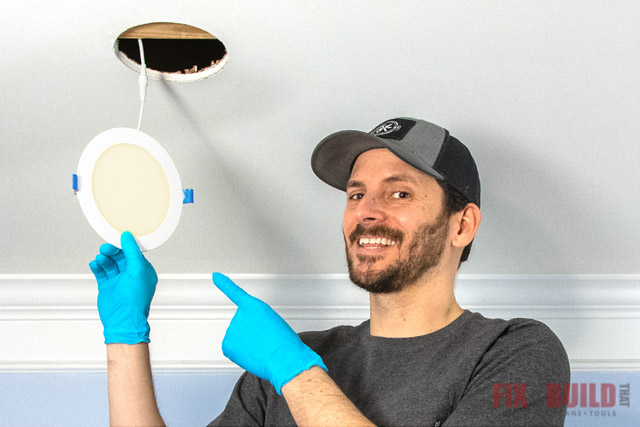
Illuminating Brilliance: How to Install Recessed Lighting in an Existing Ceiling
Introduction
Recessed lighting is a sleek and modern way to brighten up any room, and installing it in an existing ceiling can be a rewarding home improvement project. Whether you want to enhance the ambiance of your living space or improve task lighting in specific areas, this guide will take you through the steps of installing recessed lighting in your existing ceiling.
Advantages of Recessed Lighting
Recessed lighting offers several advantages, making it a popular choice for homeowners:
- Sleek Aesthetics: Recessed lights are unobtrusive and provide a clean, modern look to any room.
- Versatility: They can be used for general lighting, accent lighting, or task lighting, offering versatility in design and functionality.
- Space-Saving: Recessed lights don’t take up floor or wall space, making them an excellent choice for smaller rooms.
Tools and Materials
Before starting the installation process, gather the necessary tools and materials:
- Recessed lighting kit
- Power drill
- Hole saw
- Screwdriver
- Wire strippers
- Voltage tester
- Cable staples
- Wire nuts
- Safety glasses
- Ladder
Steps to Install Recessed Lighting in an Existing Ceiling
1. Choose the Right Lighting Fixture
Select recessed lighting fixtures that suit the room’s purpose and your aesthetic preferences. Consider factors such as the color temperature of the bulbs and the angle of the light spread.
2. Plan the Layout
Determine the layout of your recessed lights based on the room size, purpose, and any existing lighting fixtures. Aim for even spacing and avoid placing lights too close to walls or corners.
3. Locate Joists and Wiring
Use a stud finder to locate ceiling joists. Ensure there is enough space between joists to accommodate the recessed lights. Identify existing wiring and plan your installation around it.
4. Turn Off Power
For safety, turn off the power to the existing ceiling light fixture at the circuit breaker. Use a voltage tester to confirm that the power is off before proceeding.
5. Remove Existing Fixture
Take down the existing ceiling light fixture by removing the screws or nuts securing it. Once detached, carefully disconnect the wiring.
6. Mark and Cut Holes
Using the chosen layout as a guide, mark the locations for the recessed lights on the ceiling. Use a hole saw to cut holes for the lights. Ensure the holes are the right size for the fixtures you’ve chosen.
7. Run Wiring
Run electrical cable from the existing light fixture to the first recessed light hole. Secure the cable to the ceiling joists using cable staples. Repeat this process for all the lights in your layout.
8. Connect Wiring to Lights
Follow the manufacturer’s instructions to connect the wiring from the electrical cable to each recessed light fixture. Typically, this involves matching the black (hot) and white (neutral) wires and securing them with wire nuts.
9. Secure Fixtures in Place
Insert the recessed light fixtures into the holes and secure them to the ceiling joists using the provided clips or brackets. Adjust the fixtures as needed to align with your planned layout.
10. Test and Adjust
Turn the power back on and test each recessed light to ensure they are working correctly. Make any necessary adjustments to the angle or positioning of the fixtures to achieve the desired lighting effect.
Frequently Asked Questions
Q1: Can I install recessed lighting in any room?
A1: Yes, recessed lighting can be installed in virtually any room. It is commonly used in living rooms, kitchens, bedrooms, and even bathrooms.
Q2: What type of bulbs should I use for recessed lighting?
A2: LED bulbs are a popular choice for recessed lighting due to their energy efficiency and longevity. Choose bulbs with the desired color temperature for your specific lighting needs.
Q3: How far apart should recessed lights be placed?
A3: The spacing between recessed lights depends on the room size and the type of lighting desired. In general, aim for even spacing with lights placed about 4 to 6 feet apart for general lighting.
Q4: Can I install recessed lighting in a sloped ceiling?
A4: Yes, there are special sloped-ceiling housing fixtures designed for installation in angled or sloped ceilings. These fixtures ensure proper alignment and coverage.
Q5: Do I need a professional electrician for recessed lighting installation?
A5: While it is a project that many homeowners can tackle, if you are not comfortable working with electrical wiring, it’s advisable to hire a professional electrician to ensure safety and compliance with local codes.
Q6: Can I install dimmer switches for recessed lighting?
A6: Yes, recessed lighting fixtures are often compatible with dimmer switches, allowing you to adjust the brightness according to your preferences and the specific needs of the room.
Q7: What should I do if my ceiling has insulation?
A7: If your ceiling has insulation, use insulation-contact (IC) rated recessed lighting fixtures. These fixtures are designed to be in direct contact with insulation without presenting a fire hazard.
Q8: Can I install a ceiling fan in conjunction with recessed lighting?
A8: Yes, many homes have both ceiling fans and recessed lighting. Ensure that the electrical wiring and fixtures are compatible, and follow safety guidelines for installation.
Q9: How do I determine the right size of recessed lighting for a room?
A9: The size of recessed lighting is often indicated by the diameter of the fixture. Choose fixtures that complement the room size, with larger fixtures for larger rooms and vice versa.
Q10: Can I retrofit existing fixtures for recessed lighting?
A10: Yes, there are retrofit kits available that allow you to convert existing fixtures into recessed lighting. These kits typically include the necessary components for an easy conversion.
Conclusion
Installing recessed lighting in an existing ceiling is a DIY project that can enhance the ambiance and functionality of any room. By carefully planning the layout, choosing the right fixtures, and following the step-by-step installation process, you can bring a modern and stylish lighting solution to your living space. Whether you’re illuminating a specific area or transforming the entire room, recessed lighting offers a versatile and aesthetically pleasing option for homeowners looking to upgrade their lighting setup.


